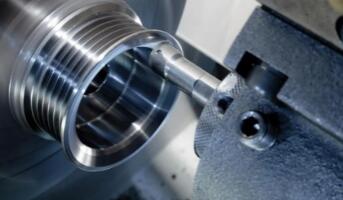
The most important link is the control of surface quality and surface accuracy of parts in machining. This paper analyzes the influencing factors of surface quality and accuracy in the machining process, improves the process way of surface quality and accuracy, and improves the overall processing level.

1. Machining surface quality and accuracy of the content
Surface quality includes apparent quality and surface roughness. There are always traces of micro unevenness in machining composed of small spacing and peak valleys on the machined surface. The degree of micro unevenness of parts is called surface roughness, which is expressed by Ra code plus number. The larger the number is, the rougher the surface is, and vice versa. It is mainly caused by the tool marks in the cutting process, the friction between the tool and the machined surface, the plastic deformation during cutting separation, and the high frequency vibration of the whole process system. The surface quality of the workpiece directly affects the performance, mechanical properties, reliability, and service life of the workpiece.
Machining accuracy refers to the degree of deviation between the actual geometric parameters, including the workpiece's size, shape, and position shape after machining, and the values marked on the part design drawings. Machining accuracy includes three factors: dimensional accuracy; geometric shape accuracy, such as roundness, cylindricity, flatness, straightness, etc.; the accuracy of mutual position, such as parallelism, perpendicularity, coaxiality, position, and so on.
2. The influence factors of machining surface quality and precision
(1) The influence of machine tool's error and wear on machining quality and precision
The machined machine tool's geometric error determines the machined product's final quality and precision. The rotation error of the machine tool spindle, the guide rail error, and the transmission error of the main transmission chain are the main factors that directly affect the machining quality and accuracy. The shape and position errors of the machined parts are directly affected by the rotation error of the machine tool spindle, which can be divided into the runout in the diameter direction of the spindle, the axial direction of the spindle, and the swing in the angle direction. For turning shaft parts, if the diameter of the workpiece is equal, the pure radial circular runout of the spindle has little effect on the roundness of the turning workpiece. The movement of the machine tool spindle in the axial direction is in a parallel state with the guide rail, which has no direct effect on the machining accuracy of the inner and outer cylindrical surfaces. Still, it is in a vertical state with the machining end face, so the perpendicularity error will be generated.
When the spindle rotates every week, it must move along the axial direction once. If the spindle moves forward, the shape error will occur. If the thread is processed into a right spiral surface, a left spiral surface will be formed when it moves backward. When the end face is processed, the plane of the workpiece will inevitably produce periodic pitch deviation. When the spindle swings at a pure angle, the shape of the workpiece becomes a cone when turning the outer circle; when turning the end face, the cutting amount of the middle position and the edge of the end face is inconsistent, resulting in flatness error. The machine tool guide rail is the installation reference for determining the relative position of most parts on the machine tool, and it is also the reference for the horizontal or vertical movement of the moving part of the machine tool. In terms of guide rail error, the straightness error of the lathe guide rail in the horizontal plane is in the sensitive direction of the machining error of the workpiece surface, which has the greatest influence on the machining accuracy. The straightness error in the vertical plane has little effect on the machining accuracy, which is generally negligible. When there is a parallelism error between the front and rear guide rails, the tool holder will swing when it moves, causing the workpiece to have a shape error. The transmission error of the transmission chain mainly refers to the error caused by the mutual movement between the transmission components in the transmission system, such as the wear between the belt and the pulley in the belt transmission, the wear between the teeth in the gear transmission and the meshing error between the chain and the sprocket in the chain transmission.
(2) The influence of cutting motion on machining quality and precision
Cutting motion includes tool motion and cutting parameters. The friction between the tool and the workpiece will occur in the cutting work, which will cause the tool to wear. Different tool materials and types will also show processing quality and accuracy differences. During machining, the moving tool and the workpiece move together and squeeze each other to produce friction heat. The increase in tool temperature, the decrease in hardness, and the acceleration of wear affect the size of the tool. Cutting parameters include cutting speed, cutting depth, and feed rate. Cutting speed and cutting depth have a great influence on surface quality. For example, low speed and large cutting depth are selected for rough machining of parts, and high speed and small cutting depth are selected for finishing machining to improve the surface quality. Therefore, a reasonable selection of tool materials and types and cutting parameters improve parts' machining quality and precision.
(3) The influence of workpiece positioning error on machining quality and accuracy
The positioning error of the workpiece includes the non-coincidence error of the positioning reference and the manufacturing and assembly error of the positioning fixture itself. When the positioning reference of the workpiece does not coincide with the design reference, the positioning error will occur. If there is over-positioning or under-positioning in the positioning, it will cause damage to the workpiece or cannot be completed. In addition, the fixture's positioning elements will have manufacturing and installation errors, and the fixture will also wear when using, installing, and disassembling the workpiece.
3. Process measures to improve the surface quality of machining and reduce the surface roughness
- 1) Reduce the height of the residual area. The first is to change the tool's geometric parameters: increase the tool tip's radius and reduce the side deflection angle. It is also a common method to reduce the roughness of the machined surface in production to select the tool with a zero-offset angle or a wide-edge fine planer and fine-tuning tool.
- 2) Reasonable selection of cutting speed. The size of the cutting speed needs to be determined according to the material's mechanical properties to be processed. When cutting a workpiece with a large plasticity, the workpiece should be selected to avoid deformation under the action of the cutting force. A larger cutting speed should be selected to prevent the formation of build-ups and scales, thereby reducing the surface roughness.
- 3) Improve the cutting performance of the material. Appropriate heat treatment, such as normalizing quenching and tempering treatment, to improve the hardness of the material, reduce the plastic and toughness, to prevent the generation of scale.
- 4) Correct selection of cutting fluid. The cutting fluid can cool, lubricate, and clean the workpiece, so the correct and reasonable selection of the cutting fluid can prolong the tool's service life and control the cutting temperature. At the same time, the lubricating effect of the cutting fluid will improve the friction between the tool face and the workpiece's surface, significantly reducing the machined surface's roughness.
- 5) Measures taken during grinding. To reduce the surface roughness, the grinding wheel with fine abrasive particles, the smaller grinding amount, and the emulsion as the grinding fluid are selected.
- In addition to the above, methods can also be precision, ultra-precision machining, and finishing, such as precision turning, grinding, honing, grinding, polishing, and other methods as the final process processing.
4. Ways to improve the machining accuracy
There are many ways to improve machining accuracy, including direct reduction or elimination of the original error, error compensation method, error transfer method, error average method, ' on-site processing ' method, control error method, and so on. The emergence of errors is inevitable, and human factors can control the size of the error value. According to the different causes of the error, selecting the corresponding control method can improve the machining accuracy.
In a word, the surface quality of mechanical processing greatly influences the performance of parts, such as wear resistance, contact stiffness, fatigue strength, corrosion resistance, and accuracy stability. Therefore, certain surface quality requirements should be put forward for the working surface of machine parts. At the same time, to ensure and improve machining accuracy, it is necessary to analyze the main causes of errors, control various factors affecting the machining accuracy, and strive to produce economical and qualified products.
Author: Jiang Xiaobing, Jiang Airong


